Spicy Sweet Jalapeño Jelly Recipe Easy & Delicious
Jalapeño Jelly Recipe is more than just a condiment; it’s a vibrant explosion of sweet and heat that has captured the hearts (and taste buds!) of so many. If you’ve ever experienced that delightful moment where a perfectly balanced sweet and spicy kick elevates your cheese board, appetizer, or even a simple cracker, chances are you’ve encountered this magical creation. People absolutely adore this jalapeño jelly because it transforms ordinary into extraordinary. It’s that irresistible duality – the initial sweetness that gently hints at the coming warmth, followed by a pleasant, lingering jalapeño glow. What truly makes this jalapeño jelly recipe special is its incredible versatility. It’s the secret weapon for impressing guests or simply treating yourself to a flavor adventure. Get ready to unlock the secrets to making your own batch of this addictive spread!
Jalapeño Jelly Recipe
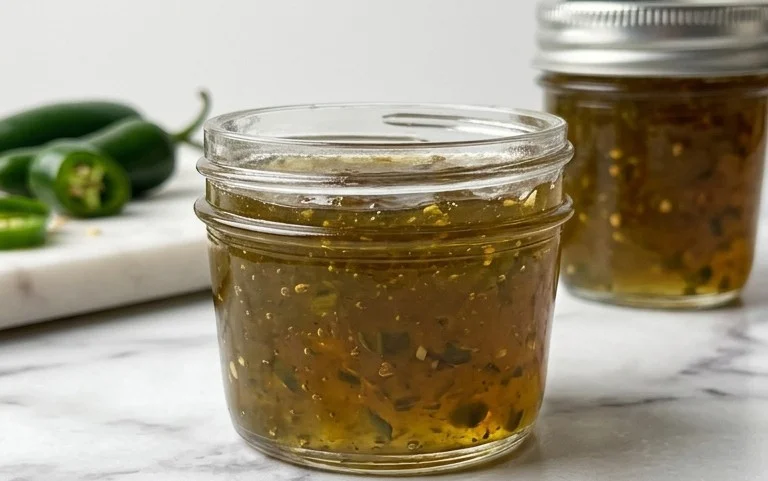
Get ready to impress your friends and family with this absolutely delicious and surprisingly simple Jalapeño Jelly recipe! This sweet and spicy condiment is incredibly versatile, perfect for slathering on crackers with cream cheese, serving alongside cheese boards, glazing roasted meats, or even as a delightful topping for breakfast biscuits. The beautiful vibrant color and the delightful balance of heat and sweetness are truly captivating.
Ingredients:
- 10 fresh jalapeño peppers, (half seeded for a milder heat, the other half left with seeds for more kick)
- 1 red bell pepper, (chopped)
- 1 green bell pepper, (chopped)
- 5½ cups granulated sugar
- 1½ cup white vinegar
- ½ teaspoon salt
- 1 (3-ounce) pouch liquid pectin
Preparing Your Peppers
The first step to achieving this spectacular jelly is to properly prepare your peppers. When handling jalapeños, it’s always a good idea to wear gloves, especially if you’re sensitive to capsaicin. This will prevent any lingering heat from transferring to your skin. For this recipe, we’re aiming for a delightful warmth, not an overwhelming inferno. So, take about half of your jalapeño peppers and carefully slice them lengthwise, then use a small spoon or your gloved fingers to scrape out the seeds and membranes. This is where a lot of the heat resides. The other half of the jalapeños can be chopped with their seeds intact to provide a more robust spicy element to your jelly. Don’t forget to finely chop your red and green bell peppers as well. These not only add beautiful color but also contribute a lovely sweetness and body to the jelly.
Blending and Simmering the Pepper Mixture
Once your peppers are prepped, it’s time to blend them. Place the chopped jalapeños (both seeded and unseeded), the chopped red bell pepper, and the chopped green bell pepper into a food processor. Pulse them until they are finely minced. You want a consistency that’s not quite a puree but definitely not chunky. This finely minced pepper mixture is the flavor powerhouse of our jelly.
In a large, heavy-bottomed pot or Dutch oven, combine the minced pepper mixture with the white vinegar and the salt. Bring this mixture to a rolling boil over high heat, stirring occasionally. Once it reaches a boil, reduce the heat to medium-low, cover the pot, and let it simmer for about 10 minutes. This simmering period allows the flavors of the peppers and vinegar to meld together beautifully, softening the peppers and infusing the liquid with their essence.
Adding the Sugar and Pectin
After the initial simmering period, uncover the pot. Now comes the crucial step of adding the sugar. Gradually stir in the 5½ cups of granulated sugar, making sure it dissolves completely before proceeding. It’s important to stir constantly at this stage to prevent the sugar from scorching on the bottom of the pot. Once all the sugar is dissolved and the mixture is smooth, bring it back to a full rolling boil over high heat. Let it boil for exactly 1 minute, stirring continuously. This brief, intense boil is essential for activating the pectin later on.
Next, it’s time to add the liquid pectin. Carefully pour in the entire pouch of liquid pectin while stirring vigorously. Continue to stir and bring the mixture back to a full rolling boil that cannot be stirred down. This is the critical point where the jelly will begin to set.
Boiling and Testing for Set
Once the jelly reaches that rolling boil that you can’t stir down, maintain this boil for exactly 1 minute, continuing to stir. This is the magic minute where the pectin works its charm. After the minute is up, immediately remove the pot from the heat.
To test if your jelly is ready to set, you can use the “cold plate” test. Place a few small plates in the freezer before you begin cooking. When you think your jelly might be ready (after the boiling period), spoon a small amount onto one of the chilled plates. Let it sit for about 30 seconds, then gently push the edge of the jelly with your finger. If it wrinkles, it’s ready. If it’s still too runny, return the pot to the heat and boil for another minute, then re-test. Be patient; sometimes it takes a couple of minutes to achieve the perfect set.
Jarring and Storing Your Jalapeño Jelly
While the jelly is still hot, carefully ladle it into sterilized jars. You can sterilize your jars by washing them in hot, soapy water and then placing them in a preheated oven at 225°F (107°C) for at least 10 minutes. Alternatively, you can run them through a dishwasher on a hot cycle. Fill the jars, leaving about ¼ inch of headspace at the top. Wipe any drips from the rims of the jars with a clean, damp cloth. Place the sterilized lids and rings onto the jars, tightening them until just fingertip tight.
For long-term storage, you can process the jars in a boiling water bath for 10 minutes. Make sure the water level is at least 1 inch above the tops of the jars. After processing, carefully remove the jars from the water bath and let them cool undisturbed on a wire rack for 12-24 hours. You’ll often hear a satisfying “ping” as the lids seal. Once cooled, check that the lids are indeed sealed by pressing down on them. If a lid flexes up and down, it hasn’t sealed and should be refrigerated and used within a few weeks. Properly sealed jars of jalapeño jelly can be stored in a cool, dark place for up to a year. Once opened, always refrigerate your delicious jalapeño jelly. Enjoy your homemade spicy-sweet creation!

Conclusion:
So there you have it! My simple yet spectacular Jalapeño Jelly recipe is ready to bring a delightful kick and a touch of sweet heat to your culinary adventures. This recipe is truly a winner because it transforms humble jalapeños into a vibrant, versatile condiment that’s surprisingly easy to make. The perfect balance of sweet and spicy is what makes this jalapeño jelly so addictive, and you’ll find yourself reaching for it time and time again.
The serving possibilities are endless! Spread it on crackers with cream cheese for an irresistible appetizer, dollop it onto grilled chicken or beef chops for a flavor explosion, or even swirl it into a cheese ball. It’s also fantastic with charcuterie boards and as a glaze for roasted meats. Don’t be afraid to experiment! You can easily adjust the heat by adding or removing jalapeño seeds and membranes. For a different flavor profile, try adding a pinch of smoked paprika or a splash of apple cider vinegar.
I wholeheartedly encourage you to give this jalapeño jelly a try. It’s a rewarding project that yields delicious results and is sure to impress your friends and family. You’ll be amazed at how quickly you can whip up this gourmet treat in your own kitchen.
Frequently Asked Questions about Jalapeño Jelly:
Can I make this jalapeño jelly less spicy?
Absolutely! To reduce the spice level, remove all the seeds and white membranes from your jalapeños. You can also use a milder pepper like a Serrano or even a green bell pepper for a truly mild version, though it will alter the classic jalapeño flavor. For a medium heat, leave in about half of the seeds and membranes. Remember, you can always add more heat in subsequent batches, but you can’t take it away!
How long does jalapeño jelly last?
When stored properly in sterilized jars in a cool, dark place, your homemade jalapeño jelly should last for up to a year. Once opened, it’s best to refrigerate it, where it will typically stay good for several weeks. Always check for any signs of spoilage before consuming.
Can I freeze this jalapeño jelly?
While it’s generally not recommended to freeze jellies made with pectin as it can affect the texture, you can freeze small portions for a shorter period. However, for the best quality and consistency, refrigeration is the preferred method of storage. The canning process helps preserve the texture and flavor far better than freezing.
Jalapeño Jelly Recipe
A sweet and spicy jalapeño jelly, perfect for appetizers and charcuterie boards.
Ingredients
-
10 jalapeno peppers, half seeded
-
1 red bell pepper, chopped
-
1 green bell pepper, chopped
-
5½ cups sugar
-
1½ cup white vinegar
-
½ teaspoon salt
-
1 (3-ounce) pouch liquid pectin
Instructions
-
Step 1
Prepare vegetables: finely chop the seeded jalapeños and the bell peppers. Wear gloves when handling jalapeños. -
Step 2
Combine chopped vegetables, vinegar, and salt in a large, heavy-bottomed saucepan. Bring to a boil over medium-high heat, stirring occasionally. -
Step 3
Add sugar and stir until completely dissolved. Bring the mixture back to a rolling boil that cannot be stirred down. -
Step 4
Add liquid pectin and stir vigorously. Return to a full rolling boil and boil for exactly 1 minute, stirring constantly. -
Step 5
Remove from heat and skim off any foam. Immediately ladle the hot jelly into prepared jars, leaving a ¼-inch headspace. -
Step 6
Wipe rims clean, apply lids and rings, and process in a boiling water bath for 10 minutes (adjust for altitude if necessary). -
Step 7
Remove jars from water bath and let cool on a wire rack for 24 hours. Check seals before storing.
Important Information
Nutrition Facts (Per Serving)
It is important to consider this information as approximate and not to use it as definitive health advice.
Allergy Information
Please check ingredients for potential allergens and consult a health professional if in doubt.